Thursday, November 7, 2024

How to build an in-wall gun cabinet with a sleek and stylish design

Posted by Alton with No comments
How to build an in-wall gun cabinet with a sleek and stylish design

Alright, so you want to build a hidden gun cabinet that's both secure and stylish? That's a pretty awesome project! You're not just looking for a safe place to store your firearms, you want something that actually adds to the look of your home. Good news, you've come to the right place!

Let's dive in and talk about how to turn a basic wall cavity into a sleek, secure, and stylish gun cabinet.

Choosing the Perfect Spot

First things first, you need to choose the perfect spot for your in-wall gun cabinet. You want a location that's both hidden and accessible, but also structurally sound. Think about where you'd naturally want to store your guns, but also where you can safely attach heavy fixtures.

Hidden in Plain Sight: Consider a closet, a hallway, or even behind a large picture or mirror. The key is to make it look like part of the room, not a separate entity.
Structural Integrity: Don't just pick a random wall! Find studs to support the weight of the cabinet. You can use a stud finder or tap lightly on the wall to hear the difference in sound when you hit a stud.

Designing the Cabinet

Now, let's get into the fun part: the design! We're going for sleek and stylish, not bulky and boring. Think about the overall aesthetic of the room.

Modern Minimalism: For a modern look, consider clean lines, simple shapes, and flush-mounted hardware. Maybe even a minimalist door that blends seamlessly with the wall.
Rustic Charm: If your home has a rustic feel, you might go with a reclaimed wood door, exposed hardware, or even a touch of copper accents.
Custom Color: Don't be afraid to paint the cabinet to match the wall color. This creates a completely integrated look.

Materials and Tools

Now, let's talk about the materials and tools you'll need:

Wood: We recommend plywood for the main structure because it's strong, durable, and relatively inexpensive.
Door Material: You have many options here â€" solid wood, plywood with veneer, even metal. Choose what fits your style.
Hardware: You'll need hinges, a locking mechanism, and possibly a door handle.
Tools: You'll need a saw, drill, measuring tape, level, and a few other basic tools.

Construction Steps

Alright, let's get down to the actual building. This is where the magic happens!

1. Measure and Mark: First, you need to precisely measure the area you're working with. You want the cabinet to fit snugly and securely.
2. Frame It Up: Use your wood to build a sturdy frame for the cabinet. You can create a simple rectangular frame or use a more complex design, depending on your preferences.
3. Add Walls and Shelf Support: Once the frame is in place, you can add the walls and shelf supports. This will give the cabinet its shape and structure.
4. Install the Door: Now, you're ready to install the door. This is where you can get creative with your design. If you're going for a flush-mounted door, make sure it fits perfectly against the wall.
5. Install the Lock and Hardware: Choose a high-quality lock for maximum security. You'll also want to install the door handle and any other necessary hardware.
6. Finishing Touches: Time to make it look awesome! Sand the wood, paint or stain it to match your room's decor, and add any decorative accents.

Safety and Security

Remember, the primary purpose of a gun cabinet is to keep firearms safe and secure. Here's a checklist to ensure you're covering all your bases:

Strong Locking Mechanism: Don't skimp on the lock! Invest in a high-quality lock that's difficult to pick or break.
Hidden Mounting: Make sure the hinges are mounted on the inside of the cabinet to prevent easy removal of the door.
Securely Attached: The cabinet should be securely fastened to the wall studs to prevent it from being pulled away.
Additional Security Measures: Consider installing an alarm system or using a motion sensor light to deter thieves.

Get Creative with Design

Here are some fun ideas to really make your in-wall gun cabinet stand out:

Built-in Lighting: Add some discreet LED lighting inside the cabinet for easy access and a modern look.
Custom-Designed Door: Think about an etched design, a unique wood pattern, or even a mirrored door that blends seamlessly with the wall.
Hidden Compartments: You can add secret compartments within the cabinet to store additional items like ammunition or cleaning supplies.
Integrated Safe: Consider adding a small, secure safe inside the cabinet for extra sensitive items.

Remember, safety first! This is a project that requires careful planning and execution. If you're not comfortable with DIY, consider hiring a professional contractor to help.

By following these steps, you can build a sleek and stylish in-wall gun cabinet that's not only secure but also enhances the aesthetic of your home. It's a project that will make you feel confident and safe, knowing your firearms are stored responsibly and discreetly. Now, go out there and build something amazing!
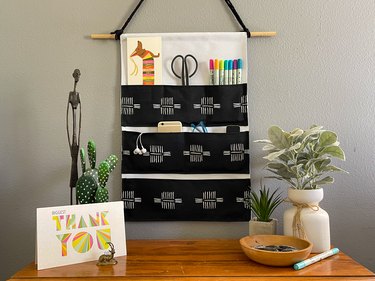
How to create a wooden wall hanging organizer for small spaces

Posted by Alton with No comments
How to create a wooden wall hanging organizer for small spaces

Hey there, space-saving superheroes! You know the struggle. Tiny apartment, overflowing with stuff, and a constant feeling of claustrophobia. But fear not, my fellow minimalist warriors! Today, we're diving into the world of DIY and crafting a super cool, space-saving wooden wall hanging organizer.

Think of it like a magical closet in miniature, hanging gracefully on your wall and swallowing up all your clutter. It's perfect for everything from keys and mail to jewelry and art supplies. And the best part? It's super easy to make, even if you're a crafting newbie.

Let's Get Our Supplies

First things first, we need to gather our magical ingredients. Don't worry, this isn't a potion-making class, but it's just as fun!

Here's what you'll need:

Wood: Choose a nice piece of wood, preferably something sturdy and light. We're aiming for that minimalist look, so think about what style you want - a rustic pallet wood, a sleek piece of birch plywood, or maybe a fun, colorful piece of MDF.
Saw: You'll need a saw to cut the wood to your desired size. A jigsaw or circular saw will do the trick.
Sandpaper: Sandpaper is our secret weapon for achieving that smooth, polished look. You'll need different grits for different stages.
Drill: We'll need a drill to make holes for hooks or pegs.
Screws: These are our trusty helpers for attaching the hooks or pegs.
Hooks or pegs: Choose the ones that fit your needs and style. You can go for classic metal hooks, rustic wooden pegs, or even some whimsical knobs.
Paint or stain (optional): To give your organizer a personal touch, you can paint or stain it in your favorite color.

Creating Your Organizer: A Step-by-Step Adventure

Now that we have our magical supplies, let's begin our crafting adventure!

1. Measure and Cut: First, decide the size and shape of your organizer. Think about the space you have available and what you want to store on it. Then, carefully measure and cut your wood to size using your saw. Remember to wear safety goggles to protect your eyes, and don't forget the safety rules!
2. Sand it Down: Once your piece of wood is cut, it's time to give it a smooth, polished look. Use sandpaper to smooth out any rough edges and imperfections. Start with a coarser grit sandpaper and gradually work your way up to a finer grit for a super smooth finish. Think of it as giving your wood a relaxing spa day!
3. Decide on your Hanging Method: Now, we need to figure out how our organizer will hang. You can choose from various options, like:
Using D-rings: Drill holes in the top corners of your wood and attach D-rings. You can then hang it with a simple rope or chain.
Hanging with a Sawtooth Hanger: Attach a sawtooth hanger to the back of your organizer, and it will hang perfectly on any nail or hook.
Using a Rope or Chain: You can create a unique hanging effect by drilling two holes near the top of your wood and attaching a rope or chain.
4. Drill Holes and Attach Hooks: It's time to get creative and add your hooks or pegs! Use your drill to create holes in your wood where you want to place your hooks or pegs. Make sure the holes are deep enough to securely hold them. Then, screw them in with the screws.
5. Finishing Touches: Now, your organizer is almost ready to tackle the clutter! If you want to add some personal flair, you can paint or stain the wood in your favorite color. Just be sure to let it dry completely before adding your hooks or pegs.

Let's Get Organized!

Finally, your wooden wall-hanging organizer is complete! Now, it's time to put it to the test and conquer that clutter. Here are some ideas for how you can use your new organizer:

Kitchen: Hang your kitchen utensils, spices, or tea towels.
Bathroom: Store your towels, toiletries, or jewelry.
Bedroom: Hang your scarves, hats, or necklaces.
Entryway: Organize your keys, mail, or sunglasses.

The possibilities are endless! Let your creativity flow and adapt your organizer to suit your individual needs.

Tips for Success:

Measure twice, cut once: This age-old adage is especially important when working with wood. Double-check your measurements before making any cuts.
Don't overtighten screws: Overtightening screws can damage your wood. Tighten them just enough to hold the hooks or pegs securely.
Use a level: Ensure your organizer is straight and level before hanging it.
Experiment with different designs: Don't be afraid to get creative and try different shapes, sizes, and styles.
Have fun!: This is your opportunity to create something unique and functional, so enjoy the process.

Embrace the Power of Organization

So, there you have it, space-saving superheroes! Your very own, handcrafted wooden wall-hanging organizer. It's simple, stylish, and a perfect solution for tackling clutter in your small space. Now, go forth and conquer those disorganized corners with the power of DIY and a touch of organization magic!

How to build a wooden step stool for the kitchen or bathroom

Posted by Alton with No comments
How to build a wooden step stool for the kitchen or bathroom

Alright, you wanna build a step stool, huh? No problem, it's a great project, perfect for beginners and anyone who wants a handy little helper around the house. Plus, you can personalize it with different woods and finishes to match your style.

Let's start with what you'll need:

Materials:

Wood: You'll need two pieces of 1x12 lumber, each about 18 inches long for the top and bottom steps. Then you'll need two pieces of 1x2 lumber, each about 18 inches long for the sides. And finally, you'll need two pieces of 1x2 lumber, each about 9 inches long for the supports.
Wood Glue: Grab some good quality wood glue.
Screws: You'll need 1 1/4 inch wood screws to secure the pieces together.
Sandpaper: You'll need some sandpaper to smooth out the edges and surfaces.
Wood Stain or Paint: This is optional, but you can stain or paint your step stool to match your kitchen or bathroom decor.
Finishing Oil or Polyurethane: To protect your wood and make it last longer.

Tools:

Miter Saw or Circular Saw: For making accurate cuts in your wood.
Measuring Tape: For measuring and marking the wood accurately.
Pencil: To mark your cut lines on the wood.
Clamps: You'll use these to hold the pieces together while they glue.
Drill: To pre-drill holes for the screws.
Screwdriver: To drive the screws into the wood.
Safety Glasses: These are essential for protecting your eyes.

Alright, let's get started!

Step 1: Cut the wood

First, carefully measure and mark your wood pieces using your measuring tape and pencil.
Use your miter saw or circular saw to cut the pieces to size. Remember, precision is key!
Cut the two 1x12 pieces to 18 inches long (these will be your top and bottom steps).
Cut the two 1x2 pieces to 18 inches long (these will be your sides).
Cut the two 1x2 pieces to 9 inches long (these will be your supports).

Step 2: Assemble the sides

Now, it's time to assemble the sides of your step stool.
Take the two 1x2 pieces that you cut to 18 inches long and lay them side by side on a flat surface.
Next, put a bead of wood glue along one edge of each piece. Make sure you put the glue on the edge that will face the inside of your stool, where the step will be.
Carefully place the 9-inch support pieces at each end, about 1/2 inch from the end of the 18-inch pieces.
Then, use clamps to hold everything securely together and let the glue dry for at least 30 minutes.

Step 3: Add the steps

Once the glue is dry on your sides, you can start adding the steps.
Lay the 18-inch 1x12 pieces on a flat surface, side by side.
Apply a bead of wood glue to one edge of the bottom 1x12 piece.
Carefully align the sides of your step stool, making sure the support pieces are flush with the edges of the step.
Use clamps to secure the sides and the bottom step together.
Let the glue dry for at least 30 minutes.
Repeat the process with the top step, gluing it to the top of the sides.

Step 4: Secure with screws

Now that the glue has dried, you'll need to add some screws to make sure your step stool is really sturdy.
Pre-drill holes through the sides and into the steps.
This will prevent the wood from splitting when you drive in the screws.
Use a screwdriver to drive in the screws. Make sure they are countersunk, meaning the head of the screw is slightly below the surface of the wood.
You'll want to use at least two screws for each side of your stool, at least one for the top step, and at least one for the bottom step.

Step 5: Sand and finish

You're almost done! Now, sand your step stool smooth, removing any rough edges or imperfections.
Start with coarser sandpaper and work your way to finer sandpaper until you have a nice, smooth finish.
If you want to stain your stool, you can apply the stain now. Let it dry thoroughly before applying a sealant like polyurethane.
If you want to paint your stool, let the stain dry thoroughly first, then use a primer before painting.

Step 6: Enjoy your new step stool

That's it! You've just built your own wooden step stool. Give it a good clean with a damp cloth to remove any dust or sanding residue. And congrats! You've built something useful for your home and had some fun doing it.

Extra Tips:

Get creative with the design: You can make your step stool even more unique by adding decorative elements. You could add a small shelf for extra storage or a built-in handle for easier carrying. You can even make it a whimsical shape, if you want.
Make it extra strong: If you're going to be using your step stool to reach higher things, you might want to reinforce it. You could use thicker wood for the sides and steps, or add extra supports.
Think about safety: Make sure your step stool is stable before using it. You can test it by placing your weight on it and making sure it doesn't wobble.

Remember, building something with your own hands can be very rewarding, especially when you can see the finished product in your kitchen or bathroom. You can even personalize it with your own unique style. So go ahead, give it a try! You can do it!

Diy wall hanging organizer using wooden crates

Posted by Alton with No comments
Diy wall hanging organizer using wooden crates

Hey there, DIY enthusiasts! Are you tired of clutter taking over your space? Do you long for a stylish and functional way to organize your belongings? Well, you've come to the right place! Today, we're diving into the world of DIY wall hanging organizers using wooden crates. These rustic beauties are not only practical but also add a touch of charm to any room.

So, grab your tools and let's get crafting!

Choosing Your Crates:

First things first, let's talk about the star of the show â€" the wooden crates! You can find these beauties at flea markets, antique shops, or even repurpose old crates from your own home. The beauty of using crates is that you can mix and match different sizes and styles to create a unique design.

If you're feeling extra crafty, you can even paint them in your favorite colors or distress them for a vintage look. The possibilities are endless!

Preparing Your Crates:

Once you've got your crates, it's time to give them a little TLC. Start by cleaning them thoroughly with soap and water. You'll want to remove any dirt, dust, or grime. Next, let them dry completely before moving on to the next step.

Adding Hardware:

Now it's time to get your crates ready for hanging. Decide whether you want to create a vertical or horizontal display. For a vertical display, you'll need to attach strong hooks or brackets to the back of each crate. For a horizontal display, you'll need to attach a sturdy piece of wood to the top of each crate for support.

If you're looking for a more minimalist look, you can also use heavy-duty picture wire and D-rings. Simply attach the D-rings to the top of the crates and then thread the wire through the rings.

Installation Time:

Once you've got your crates prepped and ready to go, it's time to mount them on the wall. Using a level and a pencil, mark the desired locations on the wall. Then, drill pilot holes for the screws or nails you'll be using.

If you're feeling bold, you can create a geometric pattern or use a variety of crate sizes to make a more dynamic display.

Styling Your Organizer:

Now for the fun part â€" styling! Let's make that crate wall organizer truly your own. Think about how you want to use your new organizational masterpiece.

Do you need a dedicated space for your favorite books? Or perhaps you're looking for a stylish way to display your plants? Maybe you need a designated spot for your craft supplies, tools, or even those adorable succulents you've been dying to add to your home.

The options are truly endless!

Tips for Styling:

Add pops of color: Use colorful baskets, containers, and decorative items to add some personality to your organizer.
Mix and match: Don't be afraid to combine different textures and patterns. A vintage crate paired with a modern plant pot can create a beautiful juxtaposition.
Embrace greenery: Plants add life and freshness to any space. Use hanging planters or place potted plants on shelves within your crates.
Consider lighting: Add fairy lights or small lamps to create a cozy and inviting ambiance.

Beyond the Basics:

Looking to take your crate organizer to the next level? Here are some ideas:

Create a "command center": Turn your crate organizer into a dedicated space for organizing important documents, keys, and mail.
Make a bar cart: Use a few crates to create a stylish bar cart for entertaining. Add some glass shelves and a few bottle holders, and you're ready to party!
Build a vertical garden: Create a beautiful vertical garden using crates and your favorite herbs, flowers, and vegetables.
Display your art: Use the crates to display your artwork, photos, or other cherished mementos.

Final Touches:

Once you've finished styling your crate organizer, take a step back and admire your handiwork! It's truly amazing what a few simple crates can achieve. And if you ever want to change things up, just rearrange the crates or add new accessories. The beauty of a DIY project is that it's always evolving.

Go Forth and Organize!

So there you have it! Now you know how to create your own amazing DIY wall hanging organizer using wooden crates. It's a fun, affordable, and sustainable way to add both style and functionality to your home. Don't be afraid to get creative and let your personality shine!

Let's make those cluttered spaces a thing of the past, one crate at a time! Happy organizing!

How to make a wooden box for planting herbs

Posted by Alton with No comments
How to make a wooden box for planting herbs

Alright, let's get our hands dirty and build a little herb haven! 🌿 You know, sometimes you just crave that fresh basil or rosemary straight from the garden, right? And buying those little pre-packed herb pots from the store can get pricey. So, why not build your own little herb box? It's a fun weekend project that'll make you feel like a real green thumb.

Gather Your Supplies:

Wood: We're talking about the foundation of your box. Choose a wood you like. I usually go for cedar, it smells nice and is naturally resistant to rot. But pine, redwood, or even reclaimed wood from an old pallet could work too. Think about the size you want your box to be. I usually make mine around 12" x 18" x 6" deep, but you can go bigger or smaller depending on your space.
Tools: A saw (a circular saw makes cutting straight lines a breeze), a drill, a screwdriver, a measuring tape, a pencil, wood glue, sandpaper, and some screws. Oh, and you'll need some wood stain or paint if you want to spruce up the look of your box.
Other Stuff: Don't forget the liner for your box! I like using landscape fabric or a thick plastic sheeting to prevent the wood from rotting. You'll also need some potting soil and, of course, your favorite herb seeds or seedlings.

Step by Step, My Friend:

1. Cut Your Wood: Measure out the sides, the bottom, and the ends of your box. You’ll need four sides, a bottom piece, and two ends. Make sure all your cuts are nice and straight! If you're not comfortable with a saw, you could get your wood pre-cut at the hardware store.
2. Assemble the Sides: Lay out your sides so they form a rectangle. Apply wood glue to the edges that will meet, and then secure them with screws. Use countersinking bits to make sure the screw heads are flush with the wood surface.
3. Add the Ends: Attach the ends to the sides of your box, using the same glue and screw method.
4. Attach the Bottom: After your box is assembled, add the bottom piece by placing it inside and securing it to the sides. You can either screw through the sides or use a few wood glue dots.
5. Sand and Finish: Sand the entire box to smooth out any rough edges. Now, get creative! Paint your box with a bright color, stain it with a nice wood finish, or even leave it natural.
6. Line Your Box: Use your landscape fabric or plastic sheeting to line the inside of your box, making sure it comes up the sides a bit. This will prevent the soil from coming into contact with the wood, which will help it last longer.
7. Get Planting! Fill your box with potting soil, leaving a little space at the top. Now, you can either sow your herb seeds directly into the soil, or you can gently remove the seedlings from their pots and plant them in your box, making sure to give them enough space to grow.
8. Water and Enjoy: Give your herbs a good watering, and then sit back and enjoy the fruits (or rather, the leaves) of your labor!

Tips and Tricks:

Go for Raised: To make your herbs even happier, consider building your box on a raised platform. This will help with drainage and make it easier to access your plants.
Don't Forget Drainage: Make sure you add some drainage holes to the bottom of your box. This will prevent the soil from becoming waterlogged.
Mix it Up: Don't be afraid to experiment with different herbs. You can create a beautiful and flavorful mix of herbs that will add a touch of garden magic to your kitchen.
Keep It Clean: Don't forget to regularly clean your herb box and remove any weeds or dead leaves. This will help keep your herbs healthy and happy.
Share Your Success: Show off your beautiful DIY herb box to your friends and family! And maybe even inspire them to build their own!

Let's Talk Herbs:

So, now that you've got your box ready, what herbs are you going to plant? Here are a few of my favorites:

Basil: Perfect for pesto, pasta sauces, and even cocktails!
Rosemary: Great for roasted meats, chicken, and even a little rosemary tea.
Thyme: Adds a delicious flavor to soups, stews, and roasted vegetables.
Mint: Perfect for making mojitos, adding to salads, or even using in desserts.
Oregano: The king of Italian cuisine, oregano is essential for pizza, pasta dishes, and more.

Remember, planting herbs isn't just about food. It's about a little piece of nature in your life, a bit of fresh air, and a touch of green therapy. And, hey, maybe you'll even be inspired to build a whole herb garden! Go on, get out there and get your hands dirty! 🌿

Build a wooden book nook for your reading space

Posted by Alton with No comments
Build a wooden book nook for your reading space

Alright, folks, let's talk about book nooks! You know, those adorable little shelves or enclosures that hold your precious books and create a cozy little reading corner? They're not just for fancy libraries anymore. You can totally DIY your own book nook, and guess what? It's easier than you think.

I recently tackled this project myself, and let me tell you, it was a blast! I felt like a little kid building a fort, but instead of blankets and pillows, I was working with wood and paint.

So, how do you actually build one? Here's the breakdown:

Step 1: Planning and Design

First things first, you gotta think about what kind of book nook you want. This is your chance to get creative! Do you want a classic bookshelf-style nook, or something more elaborate with a roof and windows? Think about the size, shape, and style that best fits your reading space.

For me, I wanted something small and compact, so I decided on a simple shelf with a little roof. I envisioned it nestled in a corner of my living room, adding a touch of whimsy and providing a dedicated spot for my favorite reads.

Step 2: Gathering Materials

You'll need a few basic materials:

Wood: This is the backbone of your book nook. You can choose from plywood, MDF, or even reclaimed wood for a rustic look. I went with plywood because it's affordable and easy to work with.
Saw: A circular saw or a jigsaw will be your best friend for cutting the wood to size.
Screws and nails: These will hold your structure together.
Wood glue: A little extra reinforcement goes a long way.
Measuring tape, pencil, and level: These will ensure your book nook is perfectly aligned and even.
Sandpaper: Smooth out any rough edges and give your book nook a nice finish.
Paint or stain: Time to add some personality! Choose colors that complement your reading space and bring your vision to life.

Step 3: Building the Structure

Now comes the fun part â€" building!

1. Cutting the wood: Start by measuring and cutting the pieces of wood to your desired dimensions. Make sure you account for the thickness of the wood when planning your cuts.
2. Assembling the base: This is the foundation of your book nook. Depending on your design, you might have a simple shelf or a more complex structure. I built mine like a little box, with four sides and a bottom.
3. Attaching the roof: If you're going for a roof, cut the pieces and attach them to the base using screws and glue. You can get creative here! I added a small slant to my roof to give it a cottage-like feel.
4. Adding shelves: Depending on the size of your books and your preferred layout, you can add multiple shelves inside your book nook. Remember to measure carefully and cut the shelf boards to fit perfectly.

Step 4: Finishing Touches

Once your structure is complete, it's time to give it the finishing touches.

1. Sanding: Go over all the surfaces with sandpaper to smooth out any rough edges. This will ensure a smooth finish and prevent splinters.
2. Painting or staining: This is where you can really personalize your book nook! Choose colors that complement your reading space or your favorite books. You can even get creative with patterns and designs. I decided on a warm, earthy tone for my book nook, using a wood stain to accentuate the wood grain.
3. Adding details: Now for the fun part! Get creative with decorations. I added some tiny fairy lights inside my book nook for a magical touch. You can also add things like fabric, wallpaper, or even small plants to make your book nook truly unique.

Step 5: Styling and Enjoying

Now comes the most enjoyable part â€" styling your book nook and enjoying it!

1. Arranging your books: This is your chance to showcase your favorite books. Consider organizing them by genre, author, or color. Don't be afraid to mix and match different sizes and styles.
2. Adding personal touches: Make it a reflection of your personality! Add a cozy blanket, a comfy pillow, or a small lamp for reading at night. Maybe a small vase of flowers or some decorative candles.

Bonus Tips:

Safety first: Be sure to use safety glasses and gloves when working with power tools.
Measure twice, cut once: Avoid mistakes by measuring carefully before making any cuts.
Take your time: Don't rush the process. Enjoy building your book nook and add your own personal touches.

So, there you have it! Building a book nook is a rewarding project that can truly transform your reading space. It's a chance to unleash your creativity and build something you'll love for years to come.

Now, go forth and create your own cozy reading haven!

Build a wooden garden bench for your patio or backyard

Posted by Alton with No comments
Build a wooden garden bench for your patio or backyard

Alright, friends, let's talk about building a garden bench. I know, I know, it sounds like a big project, but trust me, it's way easier than you think, and the satisfaction of building something with your own two hands is totally worth it. Plus, you'll have the coolest bench on the block, custom-made just for your patio or backyard.

First things first, gather your supplies. You'll need:

Wood: I recommend using pressure-treated lumber for the base and seat, since it'll hold up to the elements better. You'll need two 2x4s for the legs, two 2x6s for the seat, and two 2x4s for the back support.
Hardware: This is where you get to customize! You'll need screws (2 1/2" and 1 1/4"), wood glue, and maybe some decorative hardware like bolts or brackets if you're feeling fancy.
Tools: A circular saw, a drill, a tape measure, a pencil, and a level will do the trick.

Alright, let's get started!

Step 1: Cut the Lumber

This is where your circular saw comes in handy. Measure and cut the 2x4s for the legs. I like to make my legs about 16 inches tall, but you can adjust this to your liking. Cut the 2x6s for the seat to the desired length â€" I usually make mine around 4 feet long, but again, personalize it! Finally, cut the 2x4s for the back support, which should be slightly longer than the seat, to provide a comfortable back rest.

Step 2: Assemble the Legs

Now, it's time to build the base of your bench. Take two of the 2x4s and lay them parallel to each other, about 16 inches apart. These will be the sides of your bench. Now, take your leg pieces and attach them to the sides, using your 2 1/2" screws. You'll want to attach two legs to each side, one at the top and one at the bottom, creating a rectangular shape. Make sure to drill pilot holes before screwing to prevent the wood from splitting.

Step 3: Add the Seat

Time for the comfy part! Take the 2x6s you cut for the seat and lay them on top of the legs, ensuring they're centered. Secure them using your 2 1/2" screws, attaching them to the top of the legs. Now, you've got the basic structure of your bench!

Step 4: Build the Back Support

Now, this is where you get creative. Take the two 2x4s you cut for the back support and attach them to the back of the seat. You can attach them directly to the seat, or you can use additional pieces of 2x4 to create a more angled back. Use wood glue and 2 1/2" screws for a strong and sturdy connection.

Step 5: Finishing Touches

Alright, your bench is almost ready! Now, it's time to add the finishing touches. You can sand the wood smooth, apply a stain or paint, or add some decorative hardware like bolts or brackets. I like to use a weather-resistant stain to protect my bench from the elements and give it a nice natural look.

Step 6: Enjoy!

Congratulations! You've just built your own awesome garden bench. Sit back, relax, and enjoy the fruits of your labor. Maybe even add some cushions for ultimate comfort!

Here are some additional tips to make your project even better:

Pre-drill all holes before screwing. This will help prevent the wood from splitting.
Use wood glue in addition to screws for stronger joints.
Sand the wood smooth before staining or painting. This will help the finish adhere better.
Be sure to use pressure-treated lumber for the base and seat. This will help prevent rot and decay.
Get creative with your design! You can add decorative accents, carve details, or even build a more complex bench with armrests.

Building a garden bench is a great way to spend a weekend, and the finished product is a beautiful addition to any backyard. Just remember, the key is to have fun and enjoy the process! If you're not sure about something, don't hesitate to ask for help, or even just Google it! There are tons of resources online for DIY projects like this.

So go on, grab your tools and get started! You've got this.