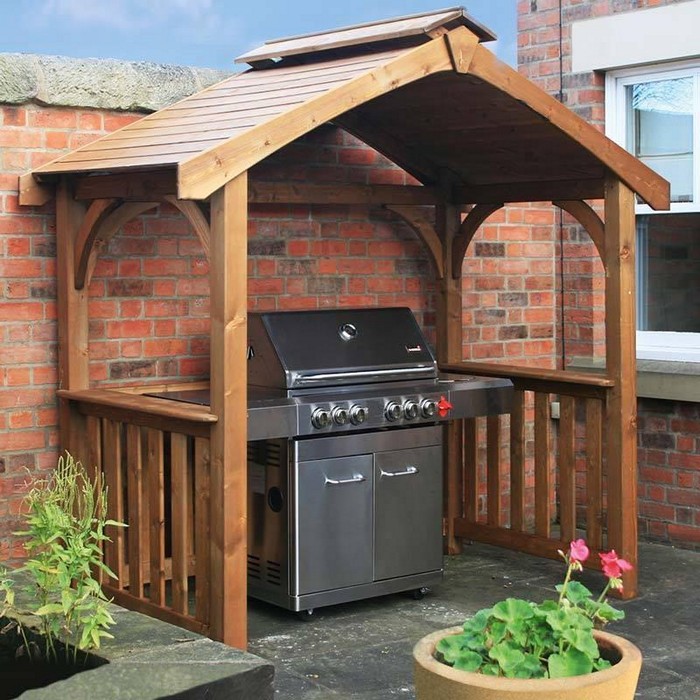
DIY Grill Gazebo: A Comprehensive Guide to Easy Construction
Embrace the joy of outdoor grilling with a custom-built gazebo that provides shade, protection from the elements, and a dedicated space for culinary adventures. This step-by-step guide offers a comprehensive approach to constructing your own grill gazebo, simplifying the process and empowering you to create a functional and stylish addition to your backyard.
Planning Your Grill Gazebo
Before embarking on the construction journey, meticulous planning is crucial. This includes determining the size, location, and desired features of your gazebo.
1. Define the Dimensions
Consider the size of your grill, the space needed for movement around the grill, and the number of people you wish to accommodate. A standard gazebo size of 10 feet by 10 feet is generally sufficient for most grilling setups. Measure the dimensions of your chosen location and ensure that the gazebo will fit comfortably.
2. Choose a Location
Select a level and accessible area in your backyard that receives adequate sunlight for grilling. Ensure there are no overhead obstacles like trees or power lines that could hinder construction or pose safety hazards.
3. Consider Features
Think about additional features you want to incorporate into your gazebo. These could include:
- Mosquito netting: Protects against pesky insects during evenings and nights.
- Side curtains: Provide privacy, wind protection, and additional shade.
- Storage shelves: Offer convenient storage for grilling tools, spices, and other necessities.
- Lighting: Illuminate the space for evening grilling sessions.
Gathering Materials and Tools
The success of your DIY project depends on having the right materials and tools readily available. Here's a comprehensive list:
1. Framing Materials
- 4x4 pressure-treated lumber: For the posts and beams
- 2x4 pressure-treated lumber: For the rafters and roof support
- Metal connectors: For joining wood components
2. Roofing Materials
- Roofing shingles: For a traditional look
- Metal roofing panels: For a modern and durable option
- Roofing felt: For waterproofing beneath the roofing material
- Roofing nails: For securing the roofing material
3. Gazebo Enclosure Materials
- Canvas fabric: A classic and breathable option for the gazebo cover
- Vinyl fabric: Durable and weather-resistant
- Mesh netting: For mosquito protection
- Hardware: Screws, hooks, and other fasteners for attaching the enclosure
4. Tools
- Saw: For cutting lumber
- Drill: For driving screws and drilling pilot holes
- Level: To ensure accurate construction
- Tape measure: For precise measurements
- Hammer: For securing nails
- Safety glasses: To protect your eyes
- Work gloves: For protection
Step-by-Step Construction Guide
With your materials and tools gathered, you're ready to embark on the construction process.
1. Preparing the Base
- Mark the location of your gazebo posts using stakes and string. Ensure they are level and square.
- Dig holes for each post, approximately 2-3 feet deep, and ensure they are wide enough to accommodate the posts.
- Pour concrete into the holes, ensuring that the posts are plumb and secure within the concrete. Allow the concrete to set for at least 24 hours.
2. Assembling the Frame
- Cut the 4x4 lumber to the desired height for your gazebo posts.
- Secure the posts to the concrete base using metal connectors or lag screws.
- Cut and attach 2x4 lumber for the top beams and rafters, using metal connectors to create a strong and stable framework.
- Ensure that the frame is square and level before proceeding to the roofing stage.
3. Installing the Roofing
- Cut and attach the roofing felt to the rafters, ensuring it overlaps by a few inches to create a waterproof barrier.
- Secure the roofing shingles or metal panels to the felt using roofing nails, following the manufacturer's instructions.
- Ensure the roof slopes slightly to allow for water drainage. If necessary, use a level to adjust the rafters for proper drainage.
4. Creating the Gazebo Enclosure
- Cut and sew or attach the chosen fabric for the gazebo cover, leaving enough space for the roof overhang.
- Attach the cover to the frame using hooks, grommets, or other hardware, ensuring it is secure and taut.
- Install side curtains or mosquito netting if desired, using appropriate hardware for attachment to the frame.
5. Finishing Touches
- Install shelves or other desired features, using screws or brackets to secure them to the frame.
- Add lighting fixtures for evening grilling sessions.
- Apply a sealant to the wood frame to protect it from the elements.
Safety Tips
Safety is paramount during any construction project. Here are some essential tips:
- Wear appropriate safety gear, including safety glasses, work gloves, and hearing protection when necessary.
- Use caution when handling power tools and ensure they are in proper working order.
- Be aware of your surroundings and avoid working near electrical wires or other hazards.
- Have a plan for lifting heavy objects and seek assistance if necessary.
Conclusion
With careful planning, meticulous execution, and a touch of creativity, building a DIY grill gazebo can be a rewarding and fulfilling project. The satisfaction of creating a personalized outdoor space where you can gather with loved ones, enjoy delicious grilled meals, and revel in the beauty of the backyard is immeasurable.


0 comments:
Post a Comment
Note: Only a member of this blog may post a comment.